Now it is time for some simple automation. Lets say something like changing the theme based on whether the sun is above or below the horizon.
Home Assistant makes use of Devices and Entities. For example, a device might be a Multi Sensor, so it will have multiple entities, one for each sensor. Most motion sensors include a temperature and luminescence or humidity etc.
This automation will trigger whenever Home Assistant starts (or restarts) and on the state of the Sun (a built-in sensor).
 - alias: change theme
   trigger:
   - event: start
     platform: homeassistant
   - entity_id: sun.sun
     platform: state
     to: above_horizon
   - entity_id: sun.sun
     platform: state
     to: below_horizon
   action:
   - data_template:
       name: >
         {% if states.sun.sun.state == "above_horizon" %}
           oxfordblue
         {% else %}
           darkorange
         {% endif %}
     service_template: frontend.set_theme
Let’s step through the elements of the automation script:
alias – provide the automation a friendly name
trigger – set what causes the automation to activate, in this case there are three:
when your Home Assistant starts or restarts
when the Sun is above the horizon
when the Sun is below the horizon
action – what to do when the automation is triggered, in this case an if statement checking the state of the sun to select the appropriate theme name
Unfortunately, this automation uses an action statement that is currently not understood by the Configuration Automation editor. Therefore, you need to use the Configurator to edit the ‘automation.yaml’ file directly.
To enable the Moon integration (Sun comes as default), you can simply add the following YAML to your ‘configuration.yaml’ file via the Configurator:
sensor:
  - platform: moon
This sensor will return one of the following values:
new_moon
waxing_crescent
first_quarter
waxing_gibbous
full_moon
waning_gibbous
last_quarter
waning_crescent
This means you could edit the original script to change the theme based on the current phase of the moon or of course any automation.
Home Assistant can get a little confusing when it comes to Configuration. There are two separate config sections: Configuration and the Configurator. In fact due to this confusion Home Assistant have renamed the Configurator to the more suitable name of File editor.
Configuration
Configuration
This section allows for all the built-in graphical method of managing Home Assistant, if something is not available to control through the Configuration interface you need to use something like the Configurator to directly edit the YAML files.
Configuration Home Page
Out of the box, from the Configuration panel, you can manage:
Integrations
Devices
Entities
Areas
Automations
Scenes
Scripts
Persons
Zones
Users
General
Server
Customisations.
File editor (aka Configurator)
Supervisor -> File editor -> Open Web UI
Allows you to create, open, edit, save and delete files held within the config directory of Hass.io
Configurator Home Page
The guide will be specific when using either of these two sections. It is best to use the Configuration interface whenever possible, as it can provide drop down lists for many options making it much easier than knowing the specific YAML to setup integrations and entities.
Home Assistant doesn’t come out of the box with any themes, which is a shame – but there are loads available from the community.
In this part of the guide we are going to use the manual process of editing the frontend.yaml file to add a selection of themes, but later will show you how to enable HACS the Home Assistant Community Store. Although it is called a store there is no charge for adding any of the integrations, plugins or themes.
Home Assistant has a built in File editor (aka Configurator) which allows you to manually change any of the YAML files affecting the operation of Home Assistant. Most of these sections are configurable through the core Configuration panel, but some are still being migrated.
Accessing the File Editor is easy:
Supervisor -> File editor -> Open Web UI
You can also enable the ‘Show in Sidebar’ option which will give you a direct link to the Web UI of the Configurator. Especially useful at the beginning as you’ll often flick back and forth between that and the Server Controls in Configuration to restart the system and enable the changes. This is why using the built-in Configuration panel is preferred as it allows for many automatic changes without restarting.
Unfortunately, frontend theme configuration is still done directly through the YAML files (or HACS), but will use this opportunity to demonstrate how to use the File editor.
Configurator Home Page
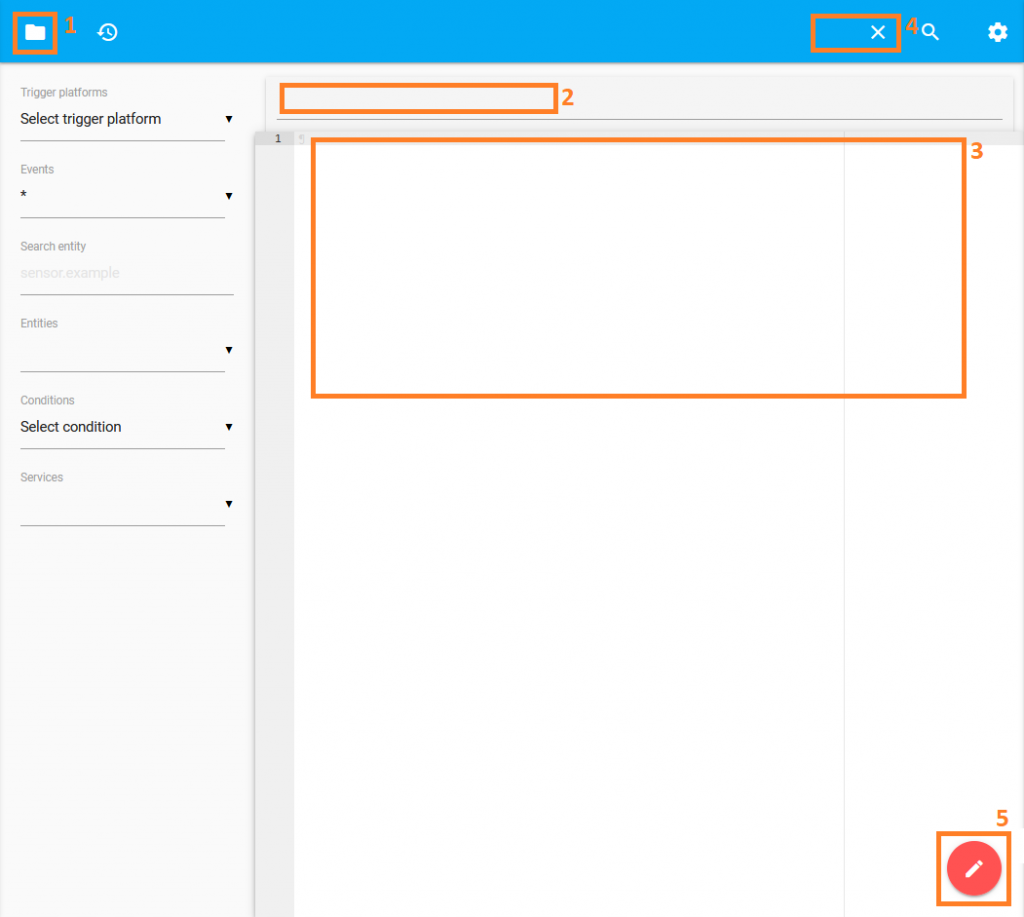
The above screen shot of the File editor shows the core sections:
File selector
File name being edited
File contents
Save and close file
New file
For this setup we are going to add some themes, so by using the file selector (1) you can choose ‘configuration.yaml’ which is the main configuration file.
We are going to add an include statement that allows us to offload the frontend configuration into another file so that the main file doesn’t get difficult to read.
frontend: !include frontend.yaml
Adding this to the ‘configuration.yaml’ file tells Home Assistant to look for and use a file called ‘frontend.yaml’
Therefore, after saving (4) and then using the new file (5) option you can create a ‘frontend.yaml’ file and add the themes into it (3).
Obviously you can write your own theme and there is some detail about how in Home Assistant documentation, but another option is to use someone elses frontend.yaml.
Due to manually editing the ‘frontend.yaml’ you’ll need to restart Home Assistant for it to re-read the configuration files.
Configuration -> Server Controls -> Server management -> Restart
Then select via the user profile what theme you want to use or get Home Assistant to set it for you depending on a sensor value, such as the Sun…
YAML is a little picky on the formatting and the right number of spaces is required. Luckily, Home Assistant Configurator shows a red warning exclamation (!) mark to depict invalid formatting and a green tick for valid.
The Server Controls in Configuration also allows to run a ‘Configuration validation’ check to confirm all configuration files are valid in formatting and expected values.
This isn’t so much of a step as it is an overview of the core interface that will be used for the rest of this guide.
Home Assistant has several sections or ‘panels’ visible to you depending on the type of account you are logged in with.
The first account that was created in Step 2 was an Administrator account which means you have access to everything. This is good and bad!
Great that you can tweak and play around with it all, but bad because you can break things. Thankfully, if you chose the same option of Home Assistant, a deletion of the database and restart usually gets you back up and running.
The initial panels available to you are:
Overview – the main front end user interface for operating and monitoring your home automation
Map – a view of device trackers and locations
Logbook – a diary of events and state changes
History – a series of bar and chart graphs
Developer Tools – behind the scenes tweaking
Supervisor – installation and host manager
Configuration – where you setup all the smart devices and entities along with scenes and automations
Notifications – user messages
User Profile – user account details and options
The Supervisor allows you to extend the functionality of Home Assistant with Add-Ons such as the Configurator to edit the YAML files directly.
The installation of Home Assistant has many options depending on where and how you would like to run it!
The main options are:
directly on your home linux computer
through docker on a home computer
directly on a Raspberry Pi 3 or above
Home Assistant doesn’t actually help itself here with all the options and there are some varying documentation that is not always applicable to all installation methods.
The easiest and most common is Home Assistant on a Raspberry Pi – which will be described in this guide. The official instructions are well documented on their site.
write the image to SD card via disk imaging software
plug the SD card into the device – in this case Raspberry Pi 3
power up and wait about 20 mins
visit ‘http://hassio.local:8123’ in a browser
As part of the first time running of the Home Assistant software, Home Assistant will ask you to create an Administrator account for you to manage and operate your home automation.
Home Assistant will also ask you for a system name, location and allow you to add any smart objects immediately discovered. All of which can be changed or setup at any point.
Lets begin with working out what the best underlying engine to build our cloud free automation on. This decision (at time of writing) won’t be too difficult as there are not that many cloud free options.